Easy Pain de Campagne (Country loaf) No kneading Recipe. Pain de campagne is the classic French country bread. It's essentially a sourdough, but it's that bit special with a touch of rye and whole wheat. It needs a little patience, but not much effort, and the wonderfully flavorful loaf is most definitely worth it.
 This easy Dutch Oven Pain de Campagne integrates two of my favorite bread-baking techniques - the BBA method, as outlined in the Bread Baker's Apprentice by Peter Reinhart, and the Forkish process, as presented in Flour, Water, Salt, Yeast by Ken Forkish.
The resulting loaf is baked in a ceramic Dutch Oven to produce a delightfully crispy crust and an airy, but not too open, crumb.
Shave the frozen milk and frozen peach.
You can have Easy Pain de Campagne (Country loaf) No kneading using 19 ingredients and 22 steps. Here is how you cook that. The Best Easy Pain de Campagne (Country loaf) No kneading Recipe - Recipe: Yummy Easy Pain de Campagne (Country loaf) No kneading
This easy Dutch Oven Pain de Campagne integrates two of my favorite bread-baking techniques - the BBA method, as outlined in the Bread Baker's Apprentice by Peter Reinhart, and the Forkish process, as presented in Flour, Water, Salt, Yeast by Ken Forkish.
The resulting loaf is baked in a ceramic Dutch Oven to produce a delightfully crispy crust and an airy, but not too open, crumb.
Shave the frozen milk and frozen peach.
You can have Easy Pain de Campagne (Country loaf) No kneading using 19 ingredients and 22 steps. Here is how you cook that. The Best Easy Pain de Campagne (Country loaf) No kneading Recipe - Recipe: Yummy Easy Pain de Campagne (Country loaf) No kneading
Ingredients of Easy Pain de Campagne (Country loaf) No kneading Recipe
- You need of 【18 cm, 7 inches (20 cm, 8 inches)】.
- You need 85 g (168 g) of strong flour *.
- It's 28 g (57 g) of plain flour *.
- You need 12 g (25 g) of wholemeal flour *.
- Prepare 0.7-1 g of malt powder* or 2 g or 1/2 tsp (4g or 1tsp) sugar. If you do not have malt powder, use sugar. Malt powder will give the bread a nice favour.).
- It's 2 g of or 1/2 tsp (4g or 1tsp) salt *.
- You need 1 g of or 1/4 tsp (2g or 1/2 tsp) dry yeast *.
- It's 84 g (168 g) of lukewarm water.
- Prepare of room temperature butter or vegetable oil.
- It's of 【If you use a 100% hydration starter dough instead of dry yeat】.
- You need 85 g (168 g) of - (starter dough/2) =strong flour.
- It's 84 g (168 g) of - (starter dough/2) =lukewarm water.
- It's of For instance, if you use 80g of starter dough, you need 85-(80/2)=45g of strong flour and 84-(80/2)=44g of water.
- Prepare of 【Option ideas】.
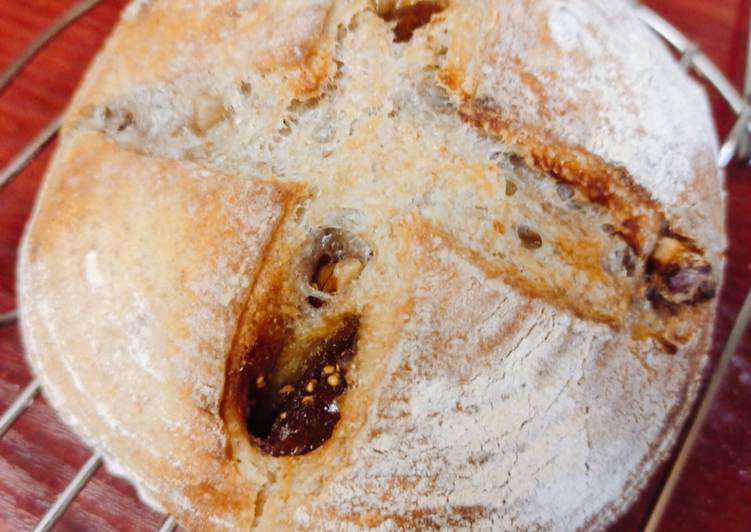
- Prepare of Fig or raisins and walnuts or any nuts or seeds.
- You need of grated cheese.
- It's of fresh herbs (parsley, basil and oregano etc) with crushed garlic.
- It's of caramelized onions.
- It's of chopped olives.
Pain de Campagne - Country French Bread Pain de campagne means "country bread" in French; it's our rustic equivalent of a sourdough. Now, of course you can buy bread at your local bakery, or you can throw some ingredients in a bread maker and hope for the best, but this beautiful loaf is so simple to make and it's the real thing. Pain de Campagne (literally Country Loaf) has become the staple bread in my house. I make it every week and keep enough around to last until I bake again.
Easy Pain de Campagne (Country loaf) No kneading instructions
- Put the dry ingredients with * in a bowl and mix..
- Pour the lukewarm water and mix well and leave 30 mins for the flour to hydrate. (1st).
- If you use 80g of 100% hydration dough starter which was started from raisins, add sourdough and add water first. I added 85-(80/2)=45g of strong flour and 84-(80/2)=44g of water. The rest of the ingredients remain the same. The recipe of the raisin dough starter is at https://cookpad.com/uk/recipes/13322647 I prefer this raisin starter to sourdough as it is much milder and no sour tastes and can use any bread recipes without giving a distinctive sour taste to the bread..
- After 30 mins, mix several times with spatula and leave 30 mins again. (2nd).
- Mix several times again and leave 30 mins. At this stage, the dough should have become stretchy. If not, you could pick up the dough and keep hold in the air to stretch the dough several times (the dough will drop so that it stretch) to help gluten to form. (3rd).
- Mix again a couple of times. Leave it for 40-60 mins to ferment until it becomes twice. After having become twice in size, take out the dough and punch it down. (1st fermentation).
- Add options if you wish..
- Hold tiwce. First, hold 1/3 and the other 1/3..
- Fold both sides down and make it round like below. Leave 10-15 mins to rest in a warm place..
- Punch down after 10-15mins..
- Again, fold twice. First, hold 1/3 and the other 1/3..
- Fold both sides down and make it round like below..
- Dust flour on to the basket or bowls lined with floured tea towels. Please dust flour well..
- Put the dough and allow it 40-60 mins till it expands twice with a dump clothe over. You could leave the dough at this stage till morning in the fridge here and bake in the morning..
- Start to preheat the oven and a cast iron pot with the lid at 250℃..
- Check the fermentation..
- If the fermentation is OK, put parchment paper over the basket and put a cutting board and turn them over..
- Remove the basket and score the top of the loaf with a sharp knife..
- Put soft butter in a parchment paper (or oil in a small bottle with a dropper) and put thin butter in the cut which will help to crack nicely..
- Put the dough in a cast-iron pot and spray around the dough. Then, put the lid on. If you do not use a cast iron pot, pour hot water in the pan and leave in the bottom of the oven and spry the dough and around the dough. The steam will make the bread crispy..
- Reduce the temperature from 250℃ to 230℃ and bake it at 230 ℃ for about 10-15 mins with a lid and without a lid for 10-15 mins till golden brown..
- Take out the dough and cool on a rack before slicing..
One loaf at a time, place the parchment over the dough and place a plate over it. Flip the dough over, remove the basket, and lift and place the loaf in the Dutch oven by using the parchment as a sling (leave the paper under the dough). Cover the Dutch oven and place it in the hot oven. Storage Notes: Store the cooled loaf in a paper bag for a day, and store in a plastic bag for a few days after that. Be sure to wear good oven mitts to prevent a steam burn.